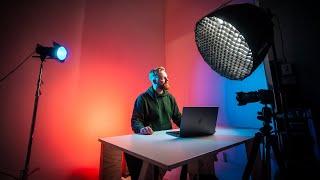
Basic Lighting Setup for Clean Video Shoots
Achieving crisp, professional-quality videos requires more than just a good camera and a creative concept. One of the most critical elements in videography is lighting. A basic lighting setup can dramatically elevate the overall look of your videos, making your subjects pop and enhancing the visual appeal for your audience. Whether you’re a beginner or someone looking to refine your video production skills, mastering the fundamentals of lighting is essential.
Why Is Proper Lighting Important for Video Shoots?
Lighting impacts the mood, tone, and clarity of your video footage. Without the right setup, images can appear dull, grainy, or unprofessional. Proper lighting:
- Eliminates harsh shadows and uneven exposure
- Highlights your subject effectively
- Enhances colors and textures for vibrancy
- Reduces the need for heavy color grading in post-production
- Provides consistency and depth, giving a cinematic feel
Understanding the Basic Lighting Types
Before setting up your lighting, it’s important to understand the three primary types of lighting used in video shoots. These form the foundation of almost every lighting scheme.
1. Key Light
Your main light source that illuminates the subject. It sets the overall exposure and focus.
2. Fill Light
Used to soften shadows created by the key light. Typically less intense and positioned opposite the key light.
3. Back Light (Hair Light)
Placed behind the subject to add depth by separating them from the background, creating a subtle rim or glow.
Step-by-Step Guide to a Basic Lighting Setup for Clean Video Shoots
Step 1: Choose Your Location and Assess Natural Light
Natural light can be a great asset. Start by choosing a well-lit room or shooting near windows. Use curtains to diffuse harsh sunlight, creating a soft and inviting glow.
Step 2: Set Up Your Key Light
Position your key light at a 45-degree angle from your subject, slightly above eye level. This positioning mimics natural sunlight and adds dimension to your face or object.
Step 3: Add the Fill Light
Place your fill light opposite the key light but at a lower intensity to reduce harsh shadows. You can use a softbox or a reflector to bounce light and keep things natural.
Step 4: Position the Back Light
Place the backlight behind your subject to create separation from the background. This adds depth and a professional edge to your footage.
Step 5: Adjust Color Temperature and Intensity
Ensure your lights have matching color temperatures – typically between 3200K (warm) and 5600K (daylight). Adjust intensity to avoid overexposure or underexposure.
Lighting Equipment Essentials for Beginners
| Equipment | Purpose | Recommended Features |
|---|---|---|
| LED Panel Lights | Adjustable key and fill lights | Dimmable, adjustable color temperature, portable |
| Softboxes | Diffuses light for softer illumination | Easy to assemble, fits LED panels |
| Reflectors | Bounces light to fill shadows without extra lights | Collapsible, multi-color surfaces (white, silver, gold) |
| Back Light / Hair Light | Highlights subject separation | Small LED light with barn doors or grid |
Practical Tips to Achieve Clean Lighting
- Use Diffusers: Soften harsh light sources with diffusion materials such as parchment paper, professional diffusers, or softboxes.
- Balance Your Light: Avoid using lights of differing color temperatures to ensure natural-looking skin tones.
- Control Shadows: Move your lights or adjust intensities to eliminate distracting shadows on the face or background.
- Keep the Background Simple: Lights on the background can add nice depth but avoid clutter or distracting elements.
- Test Your Setup: Record test footage to check how the lighting appears on camera before the actual shoot.
Benefits of Using a Basic Lighting Setup
- Professional Look: Clean lighting instantly raises video production value.
- Consistent Results: Easier to replicate lighting in future shoots for brand consistency.
- Cost-Effective: Basic setups require minimal equipment, making them budget-friendly.
- Improved Post-Production: Well-lit footage saves time and effort in color grading and editing.
First-hand Experience: How Lighting Transformed My Video Shoots
When I first started shooting videos, I relied heavily on natural light, which often resulted in grainy and uneven footage. After investing in a simple three-point lighting setup, the difference was astounding – colors became more vibrant, and my subjects appeared sharper and more engaging. The backlight added a cinematic separation that made the scene feel professional. With just a few affordable lights and some positioning practice, my content quality improved dramatically, attracting more viewers and positive feedback.
Conclusion
Mastering a basic lighting setup is a game-changer for clean video shoots. By understanding the key, fill, and backlight roles, investing in essential lighting equipment, and applying practical tips, you can dramatically enhance your video quality. Whether you’re shooting YouTube videos, interviews, or creative projects, clean lighting ensures your content looks polished and professional. Start simple, experiment with your setup, and watch your videos shine like never before!


